
接上文使用 Nextjs14 和 shopify store front api 创建自定义在线商城,继续 Nextjs 搭建 shopify 商城网站内容。在上一篇文章中,我们已经配置好了 shopify 的 api,在这篇文章中,我们实现从 api 获取数据,渲染到页面并实现一个基本的购物流程。
一.服务器查询商品列表
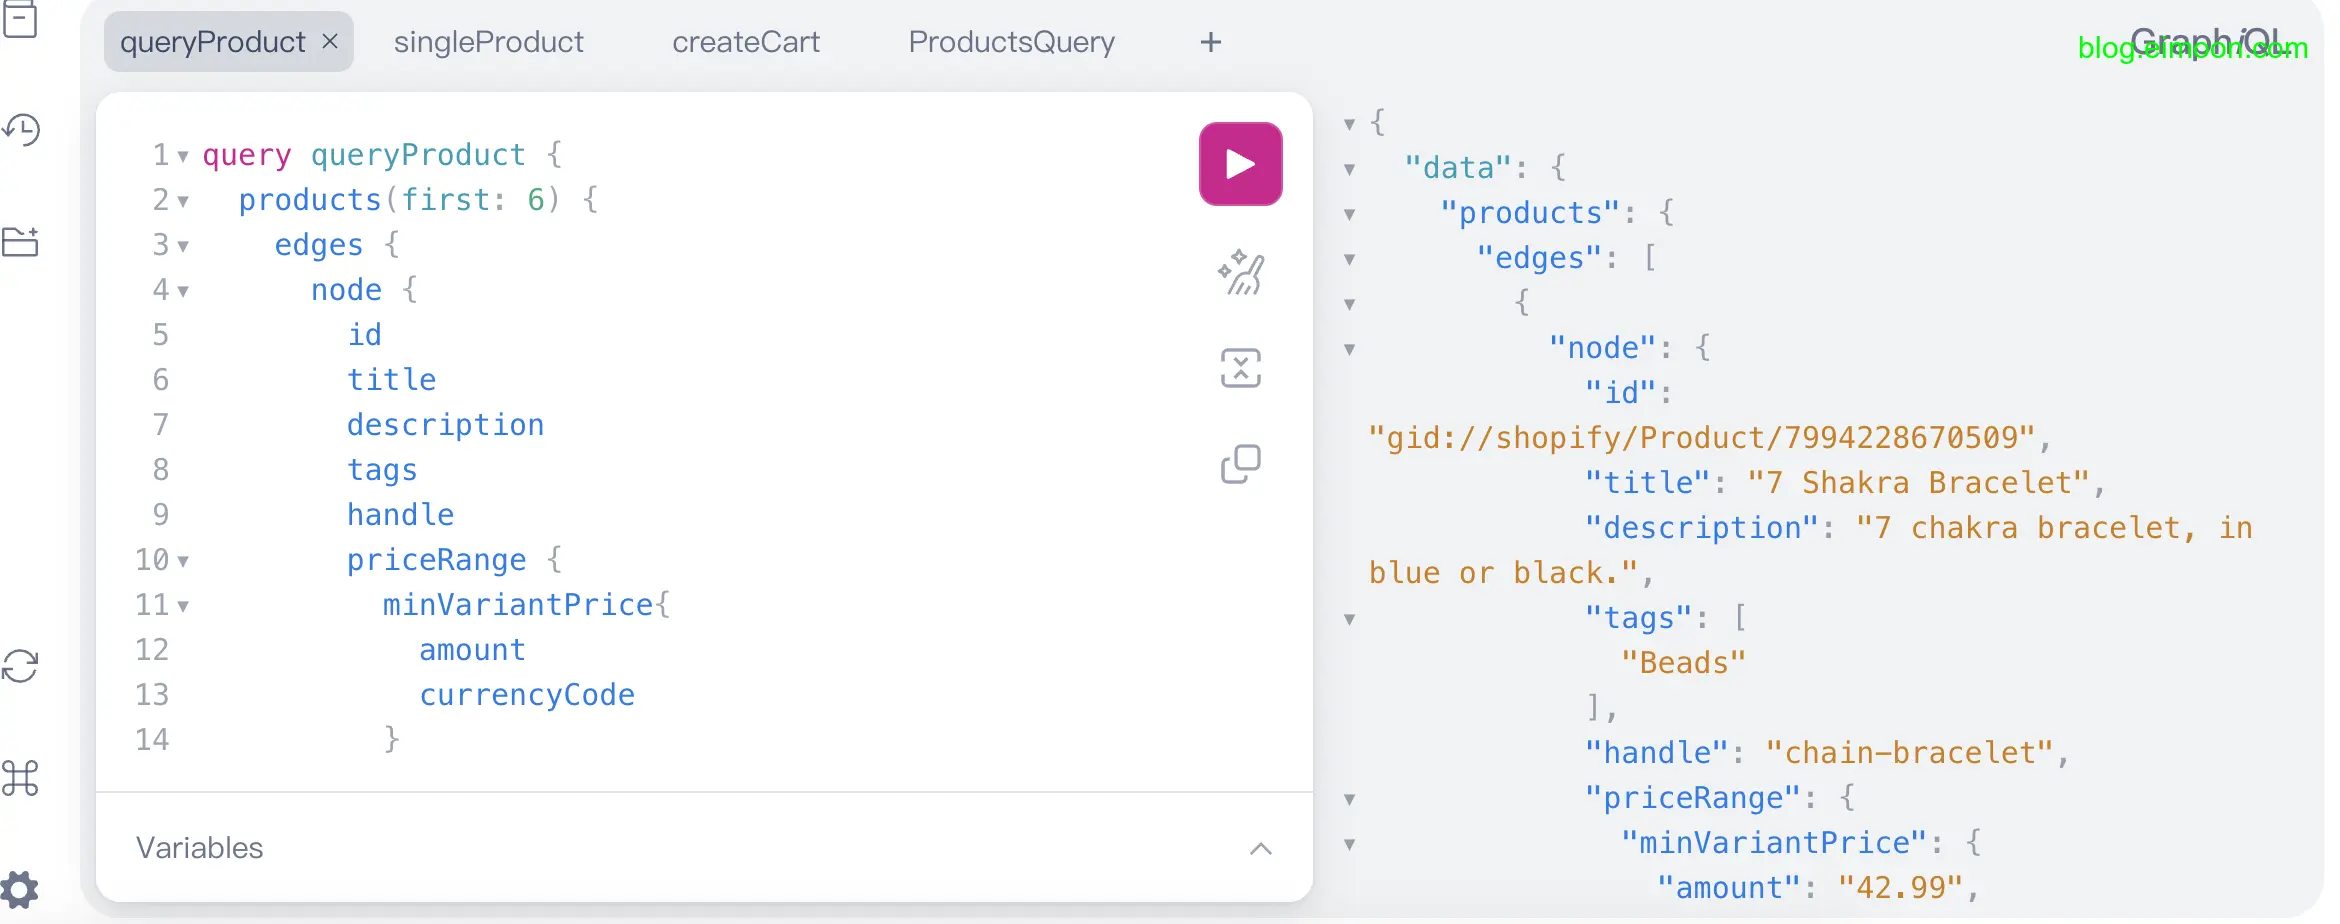
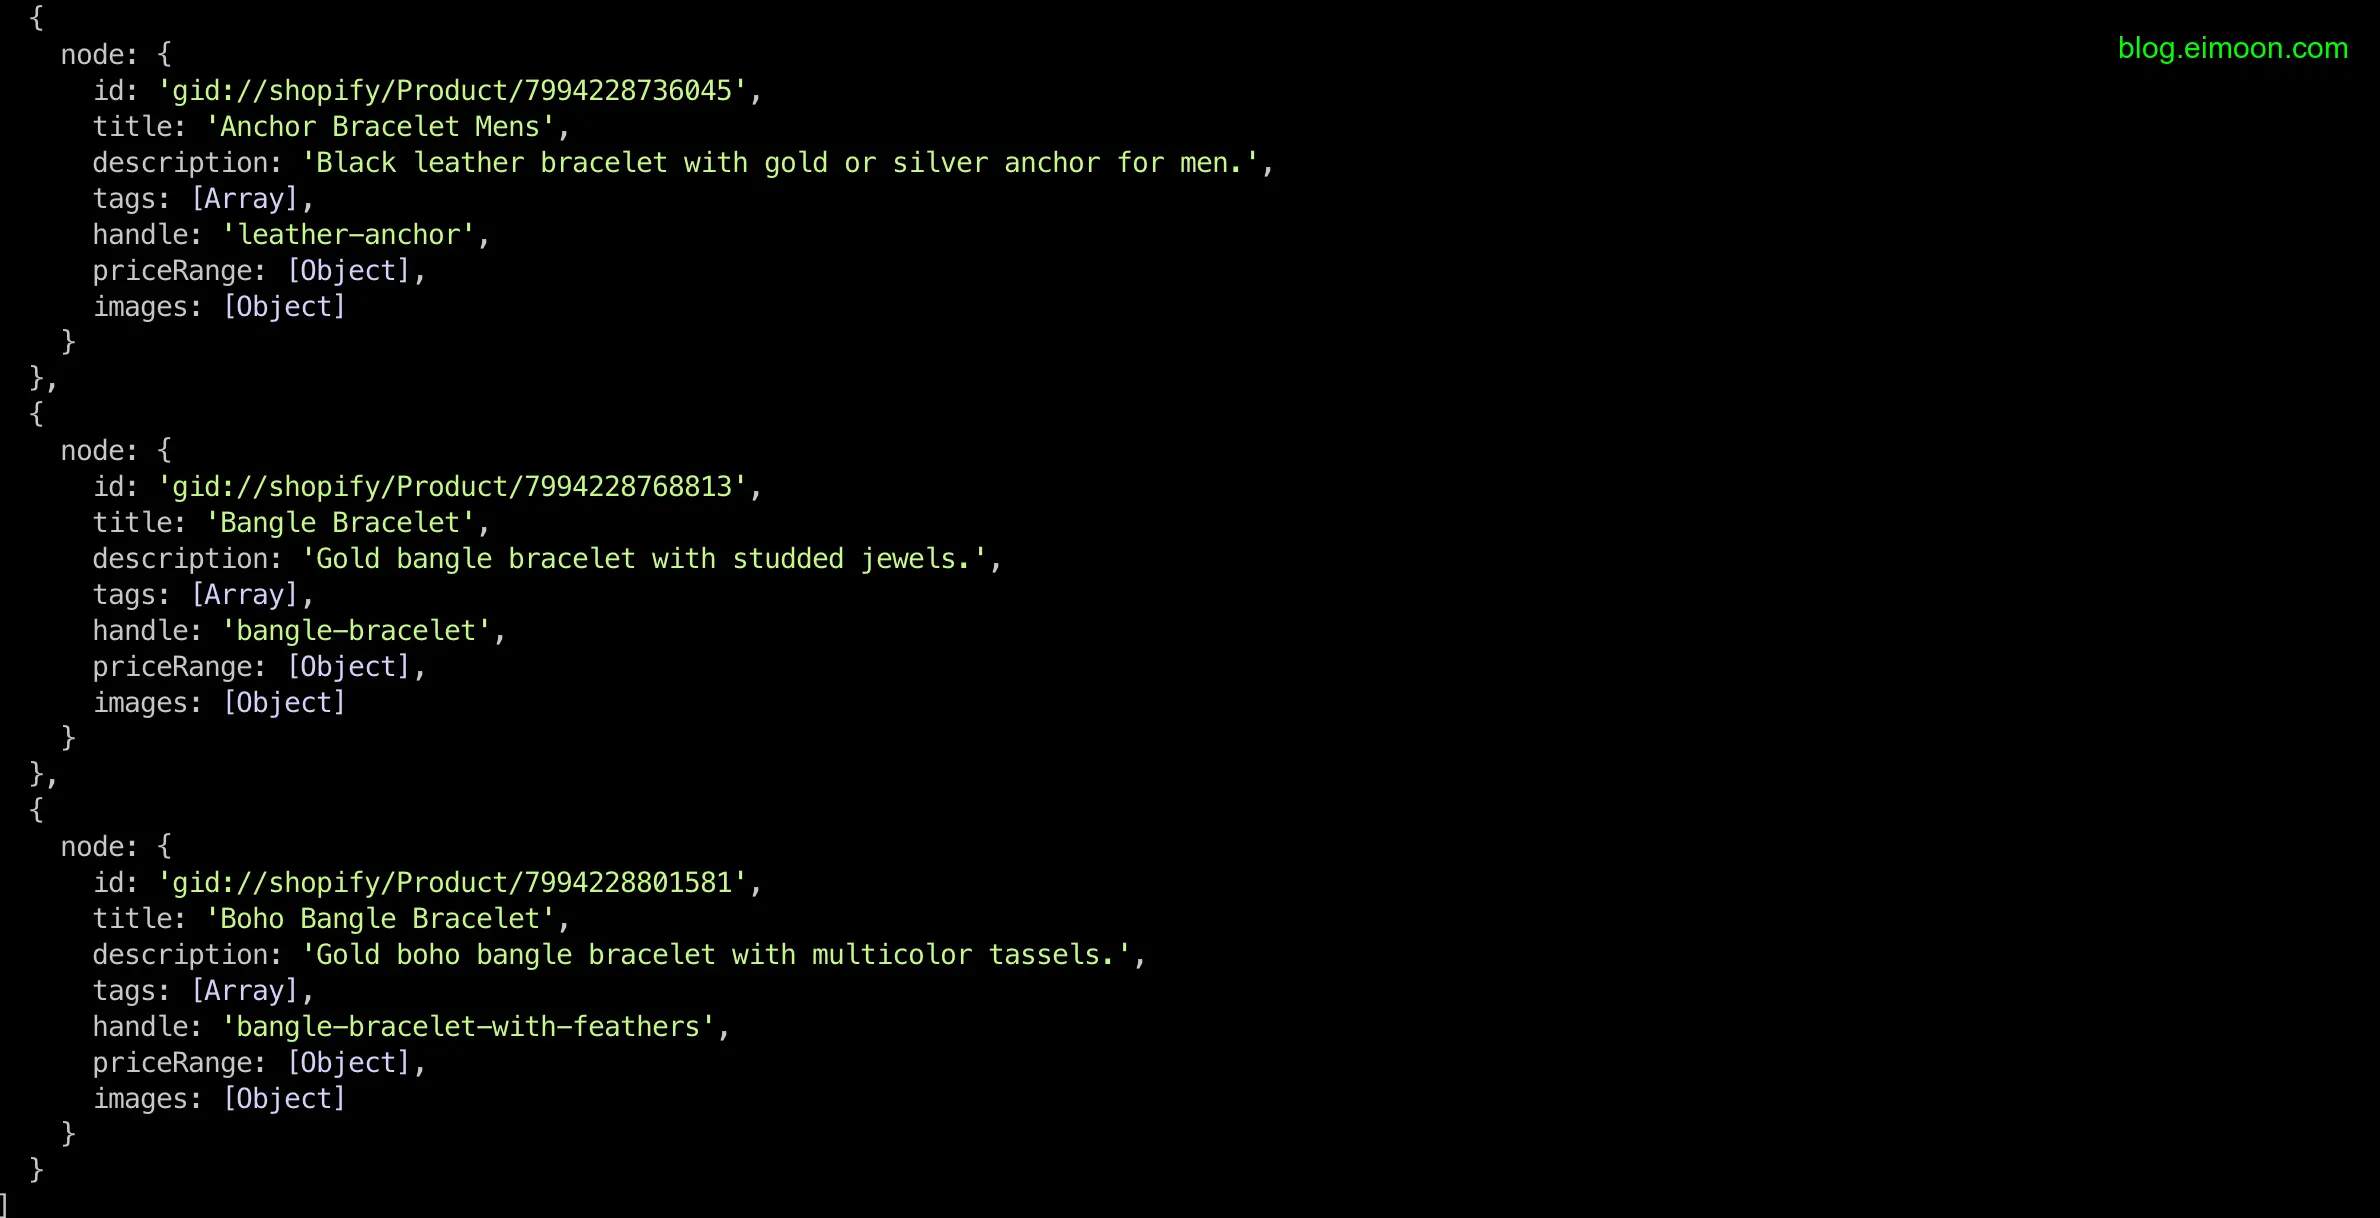
我们到 Shopify GraphiQL App 后台来查询商品列表,查询商品的 id,名称,详情,价格,商品图片字段,handle,这些都是一些常用的字段, 其中 handle 是一个可读的字符串,用于构建用户友好的 URL,后期如果需要更多字段,我们再添加。查询前 6 个商品,查询语句是这样的。
query queryProduct {
  products(first: 6) {
    edges {
      node {
        id
        title
        description
        tags
        handle
        priceRange {
          minVariantPrice{
            amount
            currencyCode
          }
        }
        images(first: 2) {
          edges {
            node {
              url
              altText
            }
          }
        }
      }
    }
  }
}
查询结果如下:
如果不知道 GraphQL 查询语句的话,可以查看文档或者使用 chatgpt 提问,对于这种有明确要求,很具体的问题,chatgpt 是非常好用的。
二.创建一个工具函数
因为我们需要很多查询,为了方便后续多个查询,封装一个工具函数,在src/lib/路径创建一个 index.ts 文件,里面定义一个通用的封装函数。
export async function shopifyFetch<T>(
  query: string,
  variables?: Record<string, any>
): Promise<{ status: number; body?: T; error?: string }> {
  try {
    // 读取环境变量
    const apiUrl = process.env.NEXT_PUBLIC_API_URL;
    const accessToken = process.env.NEXT_PUBLIC_ACCESS_TOKEN;

    if (!apiUrl || !accessToken) {
      throw new Error('API URL or Access Token is not configured.');
    }
    //   发送请求
    const response = await fetch(apiUrl, {
      method: 'POST',
      headers: {
        'Content-Type': 'application/json',
        'X-Shopify-Storefront-Access-Token': accessToken,
      },
      body: JSON.stringify({ query, variables }),
    });

    if (!response.ok) {
      throw new Error(`Request failed with status ${response.status}`);
    }

    const responseBody: T = await response.json();
    // 返回结果
    return {
      status: response.status,
      body: responseBody,
    };
  } catch (error) {
    // 调试错误处理 部署时删除
    console.error('Error fetching data:', (error as Error).message);
    return {
      status: 500,
      error: (error as Error).message || 'Error receiving data',
    };
  }
}
请求参数包括 GraphQL 查询语句和可选的变量,返回请求状态,响应体或者错误。
三.创建请求商品列表函数
使用封装函数,创建具体的功能函数。
1.首先创建数据类型
然后在 src 目录下创建一个 types 文件夹,里面创建一个 index.ts 文件,添加一下数据类型, 可以把在 shopify 后台查询到的结果数据给 chatgpt,让他总结出数据类型。
// 商品列表shopify结构
export type IProductList = {
  data: {
    products: {
      edges: Array<{
        node: Product;
      }>;
    };
  };
};

// 商品列表响应对象
export type IProductListResponst = {
  status: number;
  body?: IProductList;
  error?: string;
};
type Price = {
  amount: number;
  currencyCode: string;
};
//  shopify商品数据结构
export type Product = {
  id: string;
  title: string;
  description: string;
  tags: string[];
  handle: string;
  priceRange: {
    minVariantPrice: Price;
  };
  images: {
    edges: Array<{
      node: Image;
    }>;
  };
};
// 商品图片
type Image = {
  url: string;
  altText?: string | null;
};
2.定义查询商品列表函数
在src/lib/index.ts 创建一个查询商品列表的函数.
export async function fetchProductList(): Promise<IProductListResponst> {
  const productsListQuery = gql`
    query {
      products(first: 6) {
        edges {
          node {
            id
            title
            description
            tags
            handle
            priceRange {
              minVariantPrice {
                amount
                currencyCode
              }
            }
            images(first: 1) {
              edges {
                node {
                  url
                  altText
                }
              }
            }
          }
        }
      }
    }
  `;
  // 使用刚刚定义的函数发送请求
  const result = await shopifyFetch<IProductList>(productsListQuery);
  if (result.status === 200) {
    return { status: 200, body: result.body };
  } else {
    // 调试使用
    console.error('Failed to fetch product list:', result.error);
    return {
      status: 500,
      error: result.error || 'Failed to fetch product list.',
    };
  }
}
其中 productsListQuery 即为我们在后台(第一步)的查询语句
四.把数据渲染到前端
1.测试获取数据状态
在 app/pages.tsx 页面我们使用 fetchProductList 函数来获取数据,首先测试一下数据获取情况。
const result = await fetchProductList();

const productList = result.body?.data.products.edges;
//  先测试一下
console.log(productList);
因为这个是服务器端请求,所以查看你的终端而不是浏览器控制台,正常应该如下所示。
如果请求错误,除了检查代码的问题外,还要检查的你的网络代理
2.把数据渲染到页面中
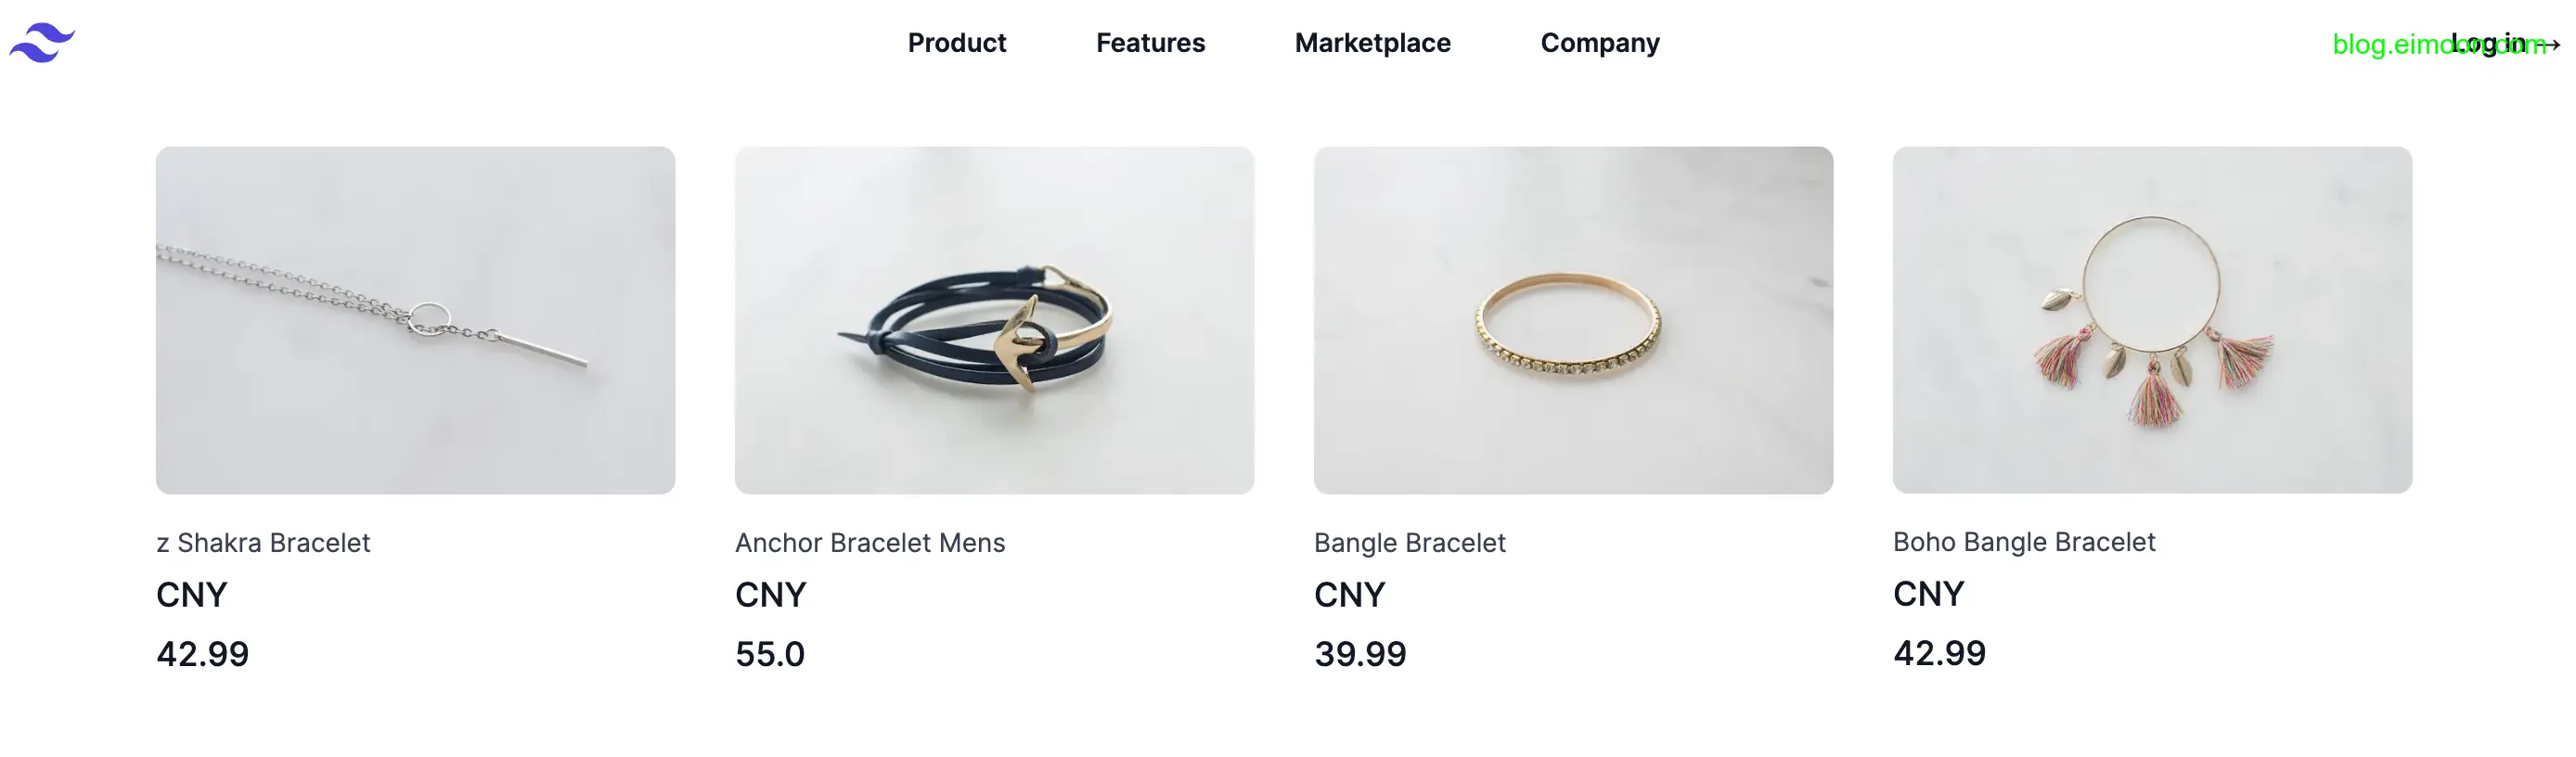
成功获取到数据后,现在我们可以把数据渲染到页面中了。
{
  productList?.map((product) => (
    <Link
      key={product.node.handle}
      href={`/products/${product.node.handle}`}
      className='group'
    >
      <div className='aspect-h-1 aspect-w-1 w-full overflow-hidden rounded-lg bg-gray-200 xl:aspect-h-8 xl:aspect-w-7'>
        <Image
          width={200}
          height={200}
          alt={'product.node.images.edges[0].node.altText'}
          src={product.node.images.edges[0].node.url}
          className='h-full w-full object-cover object-center group-hover:opacity-75'
        />
      </div>
      <h3 className='mt-4 text-sm text-gray-700'>{product.node.title}</h3>
      <p className='mt-1 text-lg font-medium text-gray-900'>
        {product.node.priceRange.minVariantPrice.currencyCode}
      </p>
      <p className='mt-1 text-lg font-medium text-gray-900'>
        {product.node.priceRange.minVariantPrice.amount}
      </p>
    </Link>
  ));
}
都是一些简单的数据渲染,其中图片我们以获取到的第一张商品图片为展示图。shopify 的数据结构很深,好在我们使用的是 ts,数据结构有代码提示,还是很方便的。
3.配置 nextjs 安全地址
为了保护您的应用程序免受恶意用户的攻击,nextjs 需要进行配置才能使用外部图像参考文档。 因此需要添加域名配置,在 next.config.mjs 中添加类似这样的配置。
    images: {
        remotePatterns: [
          {
            protocol: 'https',
            hostname: 'cdn.shopify.com',
            port: '',
            pathname: '/s/files/**',
          },
        ],
        dangerouslyAllowSVG: true,
      },
现在查看你的页面应该类似这样
4.简单优化价格展示
在 util 文件夹创建一个 formatPrice.ts 文件,里面创建一个货币格式化的函数。
export const formatPrice = (price: number) =>
    Intl.NumberFormat("zh-CN", {
      style: "currency",
      currency: "CNY",
      minimumFractionDigits: 2
    }).format(price);
修改货币展示的代码
<p className='mt-1 text-lg font-medium text-gray-900'>
  {formatPrice(product.node.priceRange.minVariantPrice.amount)}
</p>
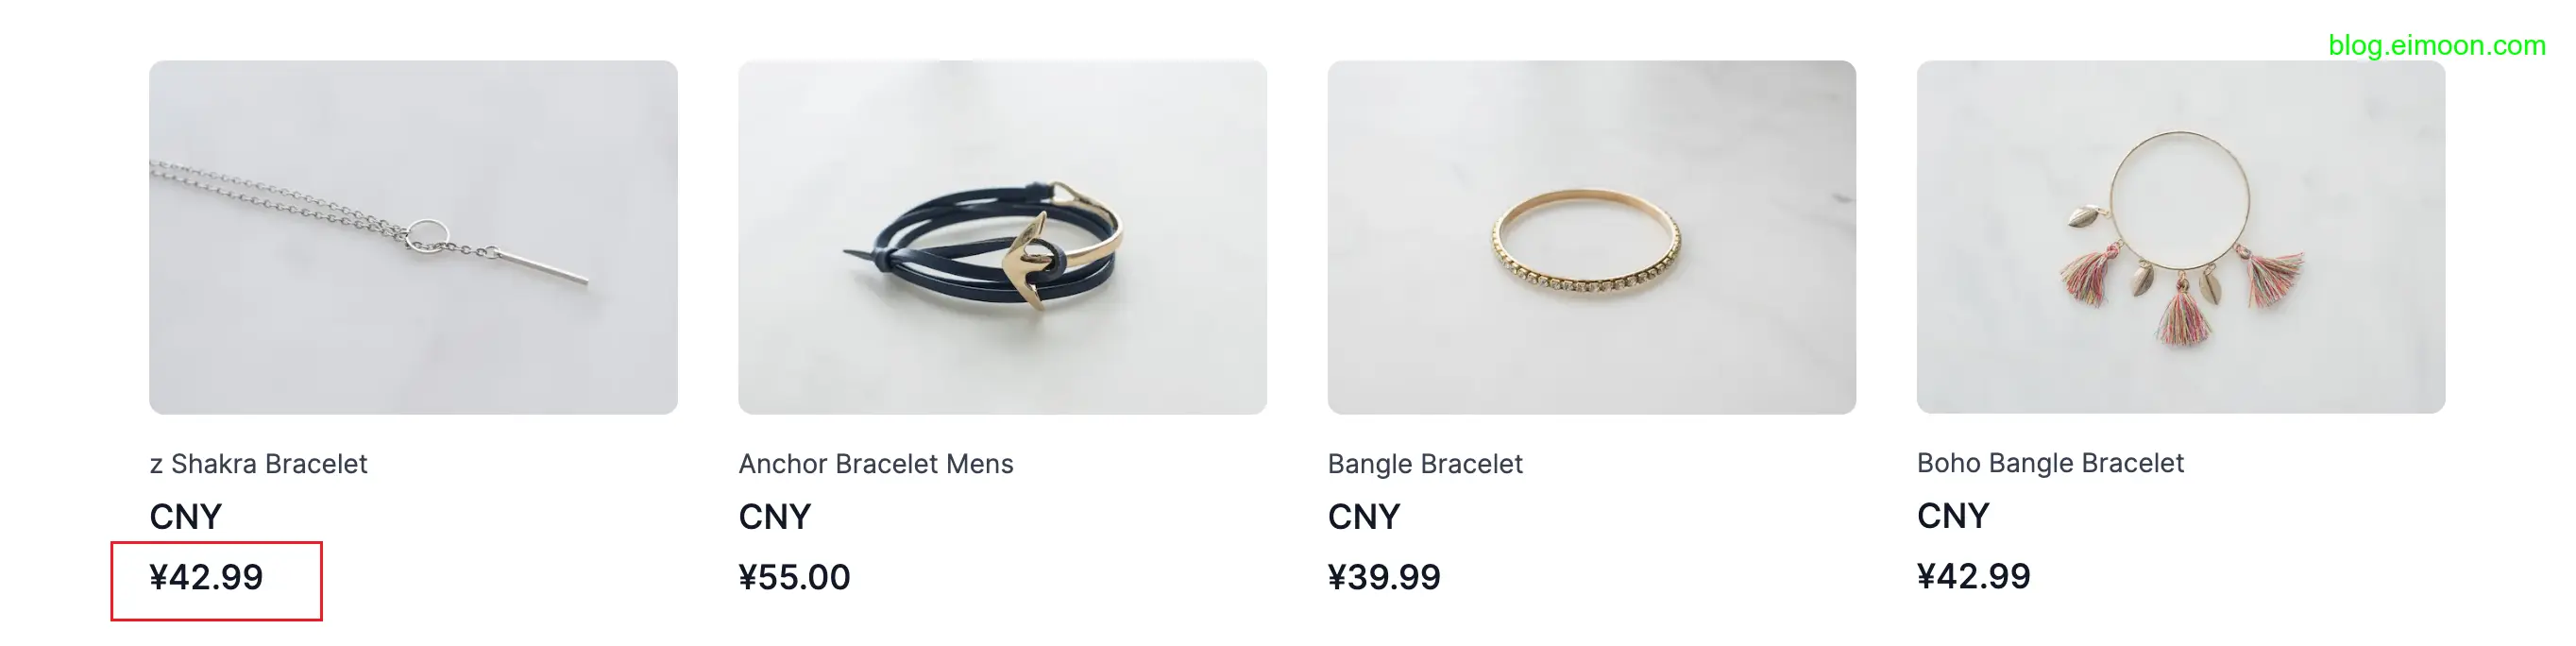
这样我们的获取商品列表就完成了。
五.查询单一商品详情
1.构建查询语句
回到 GraphiQL 后台,查询商品详情,不同于商品列表,我们需要提供一个变量$handle
query singleProduct($handle: String!) {
  product(handle: $handle) {
    title
    description
    updatedAt
    tags
    priceRange {
      minVariantPrice {
        amount
      }
    }
    images(first: 1) {
      edges {
        node {
          url
          altText
        }
      }
    }
    variants(first: 1) {
      edges {
        node {
          id
        }
      }
    }
  }
}
在后台的Variables部分添加一下变量,然后点击查询,会显示某一个商品的详情信息

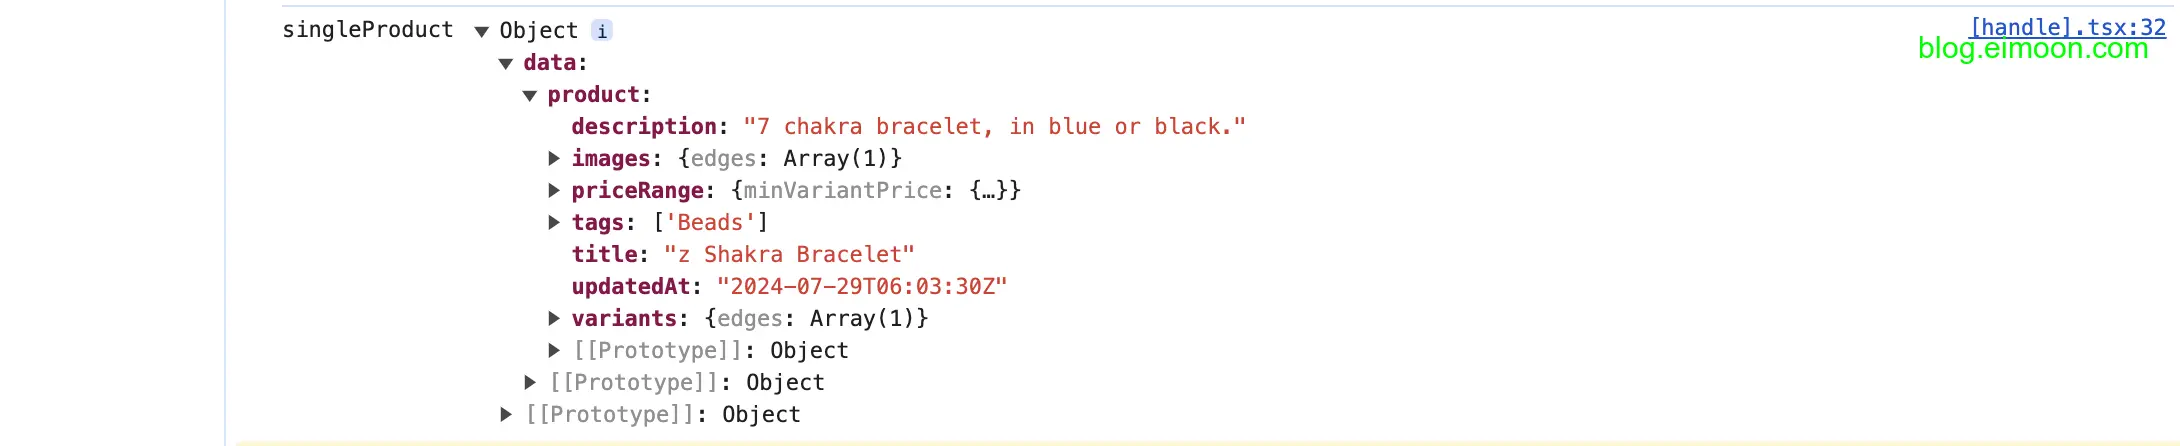
2.添加数据类型
根据上一步的查询结果定义一个商品详情数据类型。
//  单一商品数据结构
export type ISingleProduct = {
  data: {
    product: {
      title: string;
      description: string;
      updatedAt: string;
      tags: string[];
      priceRange: {
        minVariantPrice: Price;
      };
      images: {
        edges: Array<{
          node: Image;
        }>;
      };
      variants: {
        edges: Array<{
          node: {
            id: string;
          };
        }>;
      };
    };
  };
};
3.定义查询函数
现在把查询语句整理到函数中, 在 lib/index.ts 中添加函数
// 查询某一商品详情
export async function fetchSingleProduct(
  handle: string
): Promise<ISingleProductResponst> {
  const singleProduct = gql`
    query singleProduct($handle: String!) {
      product(handle: $handle) {
        title
        description
        updatedAt
        tags
        priceRange {
          minVariantPrice {
            amount
          }
        }
        images(first: 1) {
          edges {
            node {
              url
              altText
            }
          }
        }
        variants(first: 1) {
          edges {
            node {
              id
            }
          }
        }
      }
    }
  `;

  const result = await shopifyFetch<ISingleProduct>(singleProduct);

  if (result.status === 200) {
    return { status: 200, body: result.body as ISingleProduct };
  } else {
    console.error('Failed to fetch product detail:', result.error);
    return {
      status: 500,
      error: result.error || 'Failed to fetch product detail.',
    };
  }
}
四.渲染商品详情页面
1.创建商品详情页面
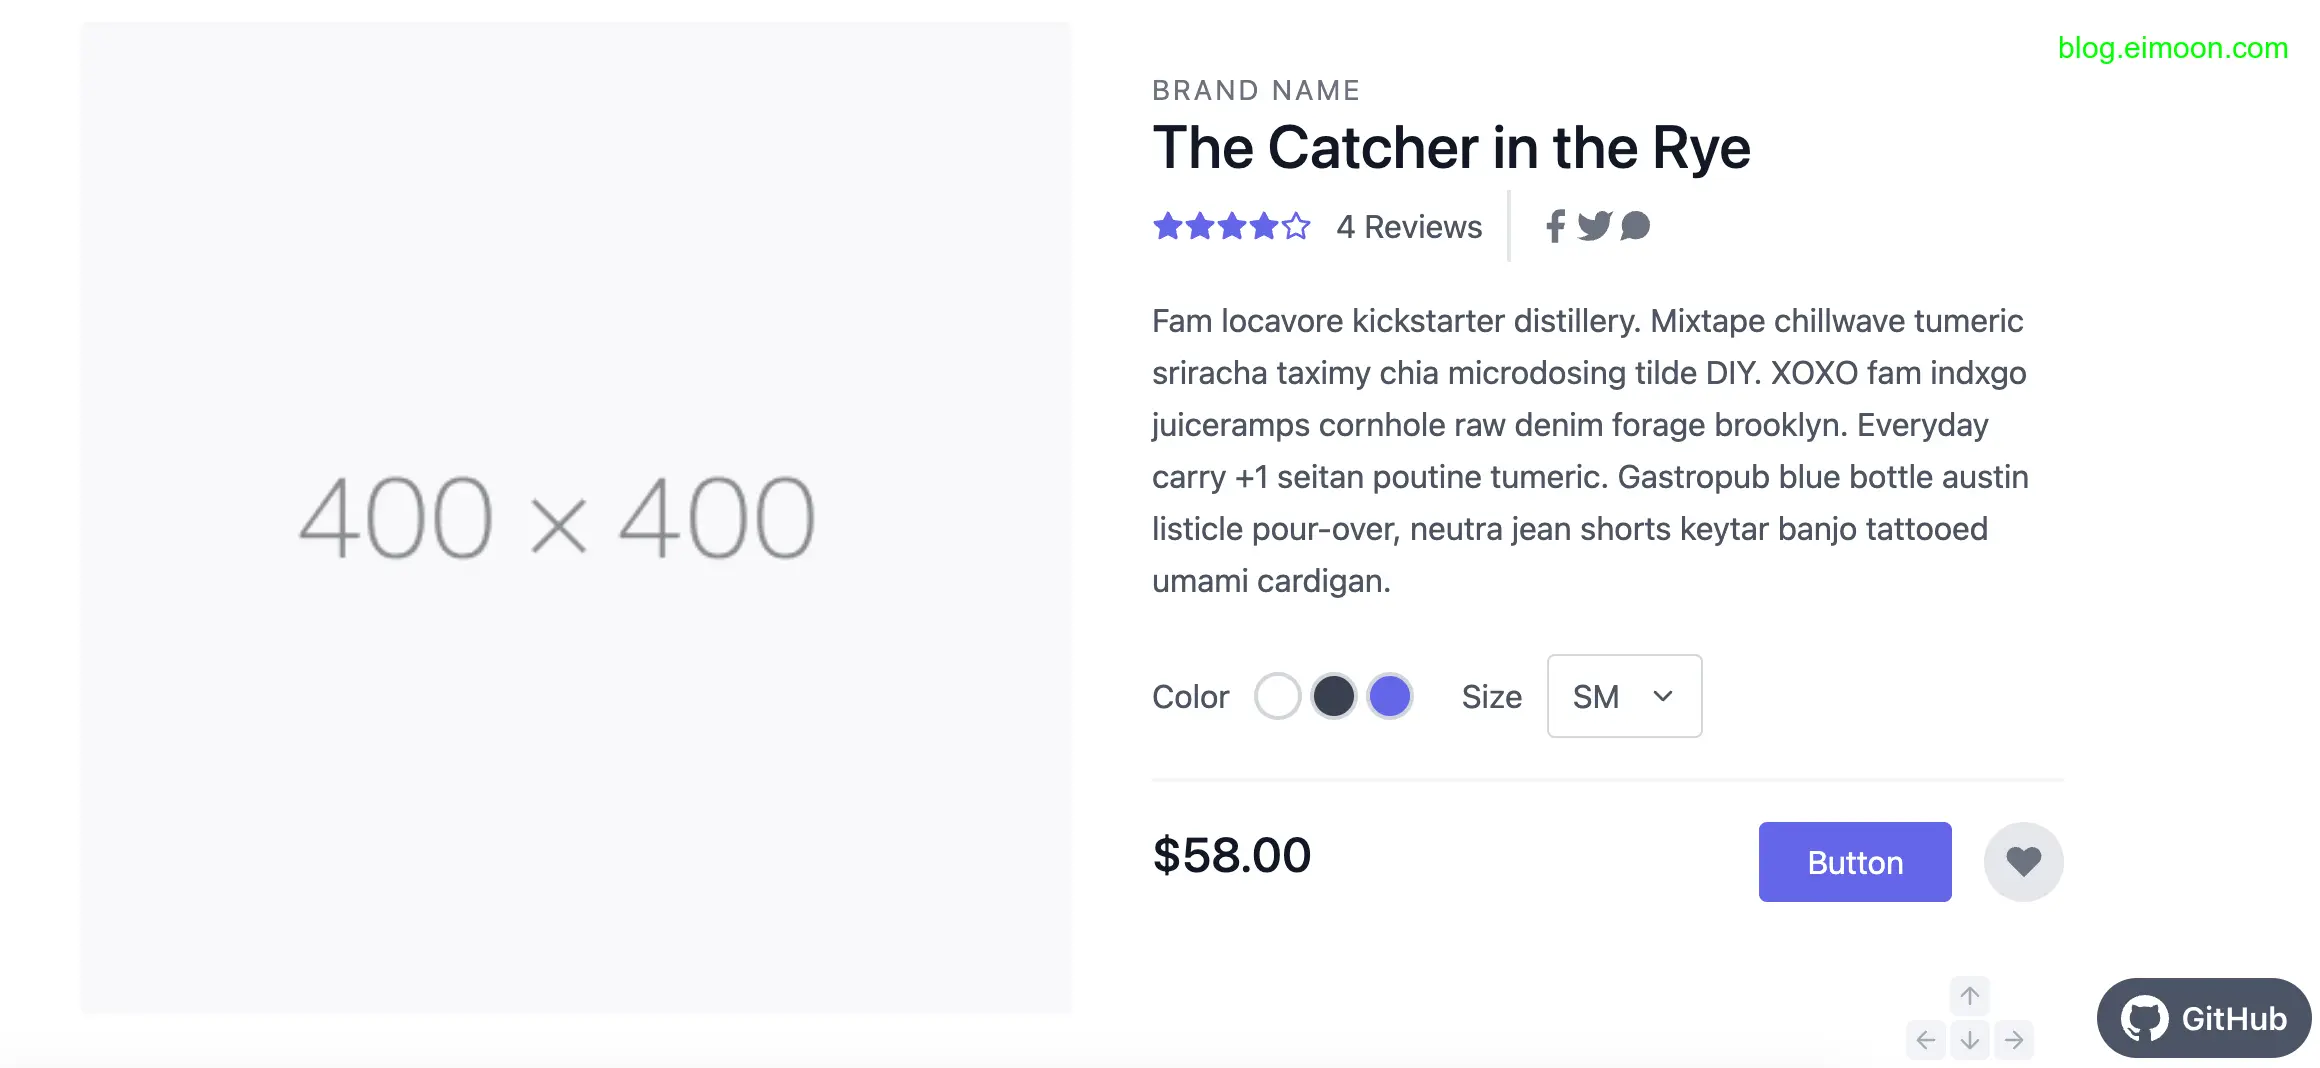
创建一个目录 src/pages/products,在里面添加一个文件[handle].tsx,添加一下商品详情,样式参考这个网站,复制这个样式,添加到 handle.tsx 页面。
2. 获取路由参数
在之前的商品列表页面中,我们使用这样的跳转链接。
<Link
  key={product.node.handle}
  href={`/products/${product.node.handle}`}
  className='group'
></Link>
现在首先要获取传递过来的参数
const params = useParams<{ handle: string }>();
定义一个 singleProduct 变量来储存数据,使用 useState 管理状态。
const [singleProduct, setSingleProduct] = useState<ISingleProduct | undefined>(
  undefined
);
然后在 useeffect 中发送请求
useEffect(() => {
  const fetchData = async () => {
    if (params?.handle) {
      try {
        const response = await fetchSingleProduct(params.handle);
        const singleProduct = response.body;
        setSingleProduct(singleProduct);
      } catch (error) {
        console.error('Error fetching product:', error);
      }
    }
  };

  fetchData();
}, [params?.handle]);

console.log('singleProduct', singleProduct);
在浏览器控制台查看有这样的输出
你也可以使用react-query 来发送请求。
这样我们成功获取到了商品详情数据,然后继续把数据渲染到页面上
<section className='text-gray-600 body-font overflow-hidden'>
  <div className='container px-5 py-24 mx-auto'>
    <div className='lg:w-4/5 mx-auto flex flex-wrap'>
      <div className='lg:w-1/2 w-full lg:pr-10 lg:py-6 mb-6 lg:mb-0'>
        <h2 className='text-sm title-font text-gray-500 tracking-widest'>
          BRAND NAME
        </h2>
        <h1 className='text-gray-900 text-3xl title-font font-medium mb-4'>
          {singleProduct?.data.product.title}
        </h1>
        <div className='flex mb-4'>
          <a className='flex-grow text-indigo-500 border-b-2 border-indigo-500 py-2 text-lg px-1'>
            Details
          </a>
        </div>
        <p className='leading-relaxed mb-4'>
          {singleProduct?.data.product.description}{' '}
        </p>
        <div className='flex border-t border-gray-200 py-2'>
          <span className='text-gray-500'>Color</span>
          <span className='ml-auto text-gray-900'>
            {singleProduct?.data.product.tags[0]}
          </span>
        </div>

        <div className='flex border-t border-b mb-6 border-gray-200 py-2'>
          <span className='text-gray-500'>Quantity</span>
          <span className='ml-auto text-gray-900'>1</span>
        </div>
        <div className='flex'>
          <span className='title-font font-medium text-2xl text-gray-900'>
            {singleProduct?.data.product.priceRange.minVariantPrice.amount}
          </span>
          <button
            onClick='{checkout}'
            className='flex ml-auto text-white bg-indigo-500 border-0 py-2 px-6 focus:outline-none hover:bg-indigo-600 rounded'
          >
            马上购买
          </button>
        </div>
      </div>
      {imageUrl && (
        <image
          width='{400}'
          height='{400}'
          alt='ecommerce'
          className='lg:w-1/2 w-full lg:h-auto h-64 object-cover object-center rounded'
          src='{imageUrl}'
        />
      )}
    </div>
  </div>
</section>
完成后的商品详情页面

五、创建订单
重复上面的步骤,在后台创建创建订单的 GraphQL 查询语句.
1.创建查询语句
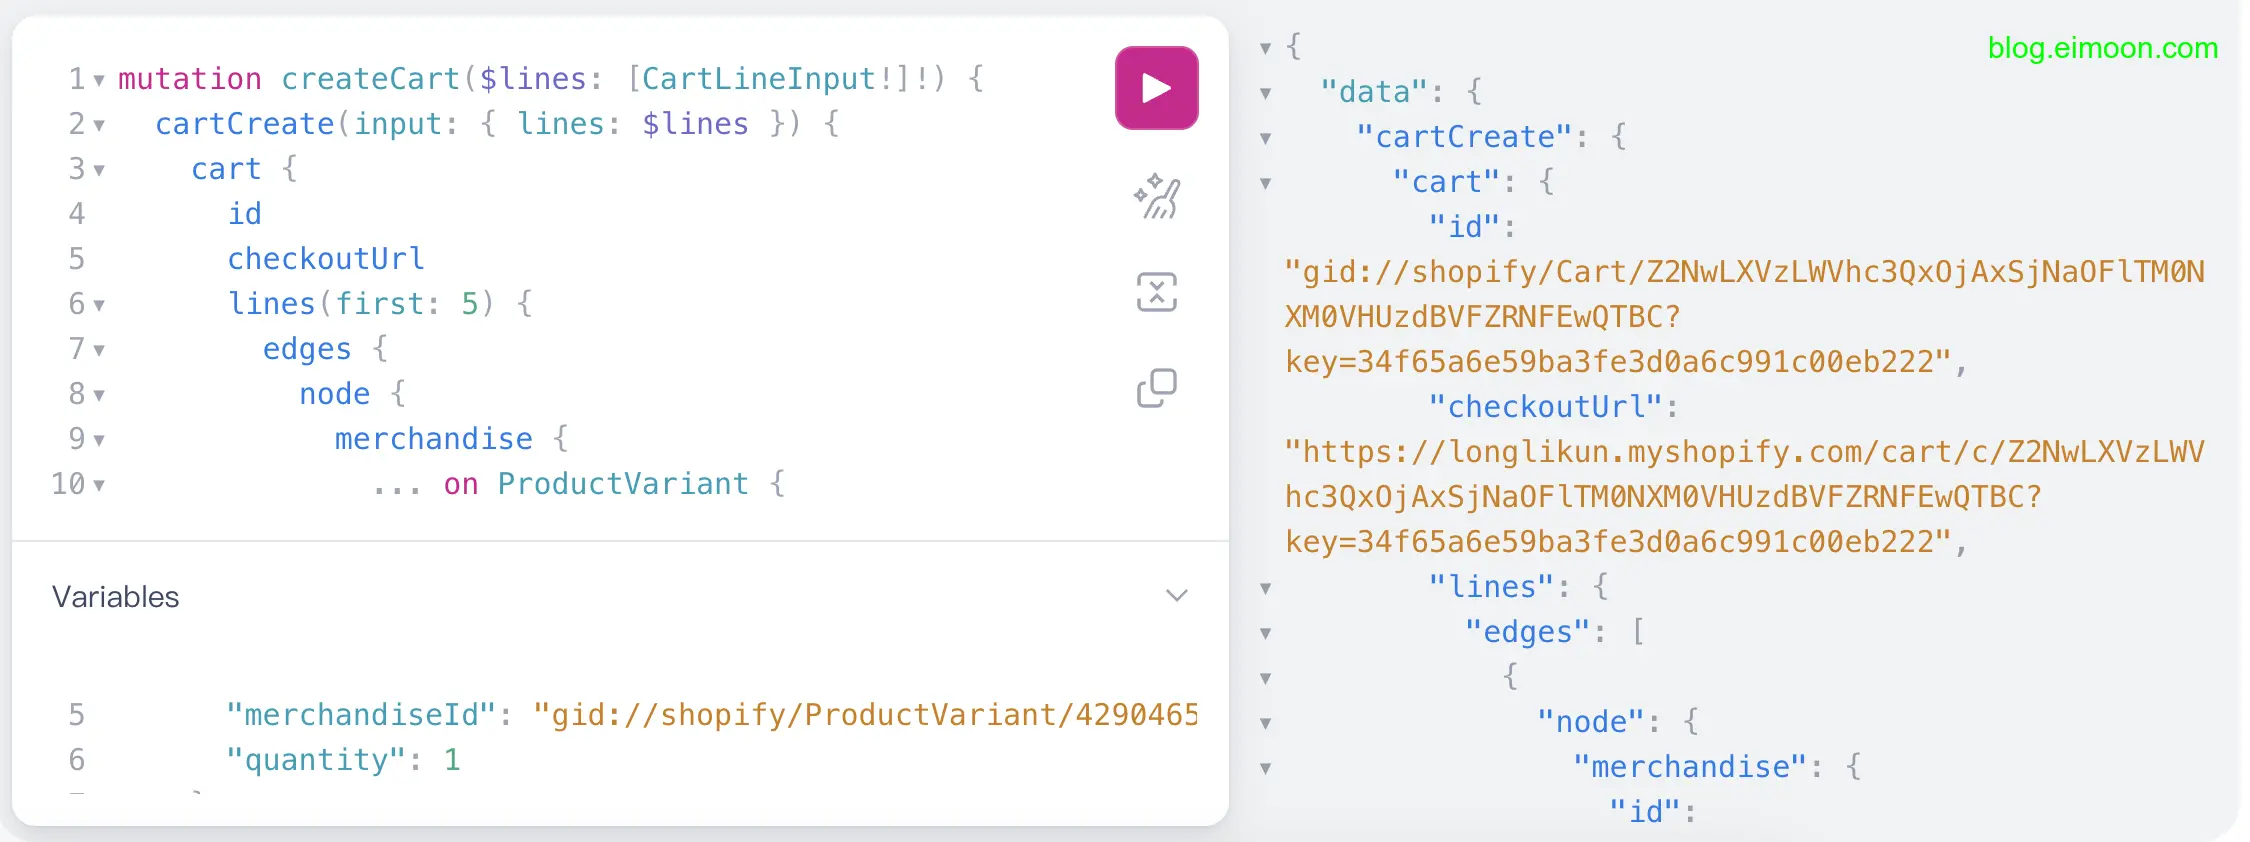
mutation createCart($lines: [CartLineInput!]!) {
  cartCreate(input: { lines: $lines }) {
    cart {
      id
      checkoutUrl
      lines(first: 5) {
        edges {
          node {
            merchandise {
              ... on ProductVariant {
                id
              }
            }
            quantity
          }
        }
      }
    }

  }
}
2.创建查询函数
在lib/index.ts 中创建一个 createCart 函数
export async function createCart(
  lines: ILineCollection
): Promise<ICartCreateResponse> {
  const checkoutQuery = gql`
    mutation createCart($lines: [CartLineInput!]!) {
      cartCreate(input: { lines: $lines }) {
        cart {
          id
          checkoutUrl
          lines(first: 5) {
            edges {
              node {
                merchandise {
                  ... on ProductVariant {
                    id
                  }
                }
                quantity
              }
            }
          }
        }
      }
    }
  `;

  try {
    const result = await shopifyFetch(checkoutQuery, { lines: lines });

    if (result.body) {
      return { status: 200, body: result.body as ICartCreate };
    } else {
      throw new Error('Failed to fetch create cart.');
    }
  } catch (error) {
    // 调试用部署时删除
    console.error('Database Error:', error);
    throw new Error('Failed to fetch create cart.');
  }
}
3 使用查询函数
定义一个 lineCollections 数组,为了方便,简化 quantity 为 1。
const lineCollections = [
  {
    merchandiseId: singleProduct?.data.product.variants.edges[0].node.id,
    quantity: 1,
  },
];
在商品详情页面中定义一个创建订单的 checkout 函数,这个函数会返回一个checkoutUrl,这个地址是shooify的真实支付页面。所以当请求成功后,跳转到这个页面进行支付。
// 创建订单
async function checkout() {
  const data = createCart(lineCollections);
  const checkoutUrl = (await data).body?.data.cartCreate.cart.checkoutUrl;
  if (checkoutUrl) {
    window.location.href = checkoutUrl;
  } else {
    console.error('Checkout URL not found');
  }
}
给 button 绑定创建订单的函数。
<button
  onClick={checkout}
  className='flex ml-auto text-white bg-indigo-500 border-0 py-2 px-6 focus:outline-none hover:bg-indigo-600 rounded'
>
  马上购买
</button>
4.测试流程
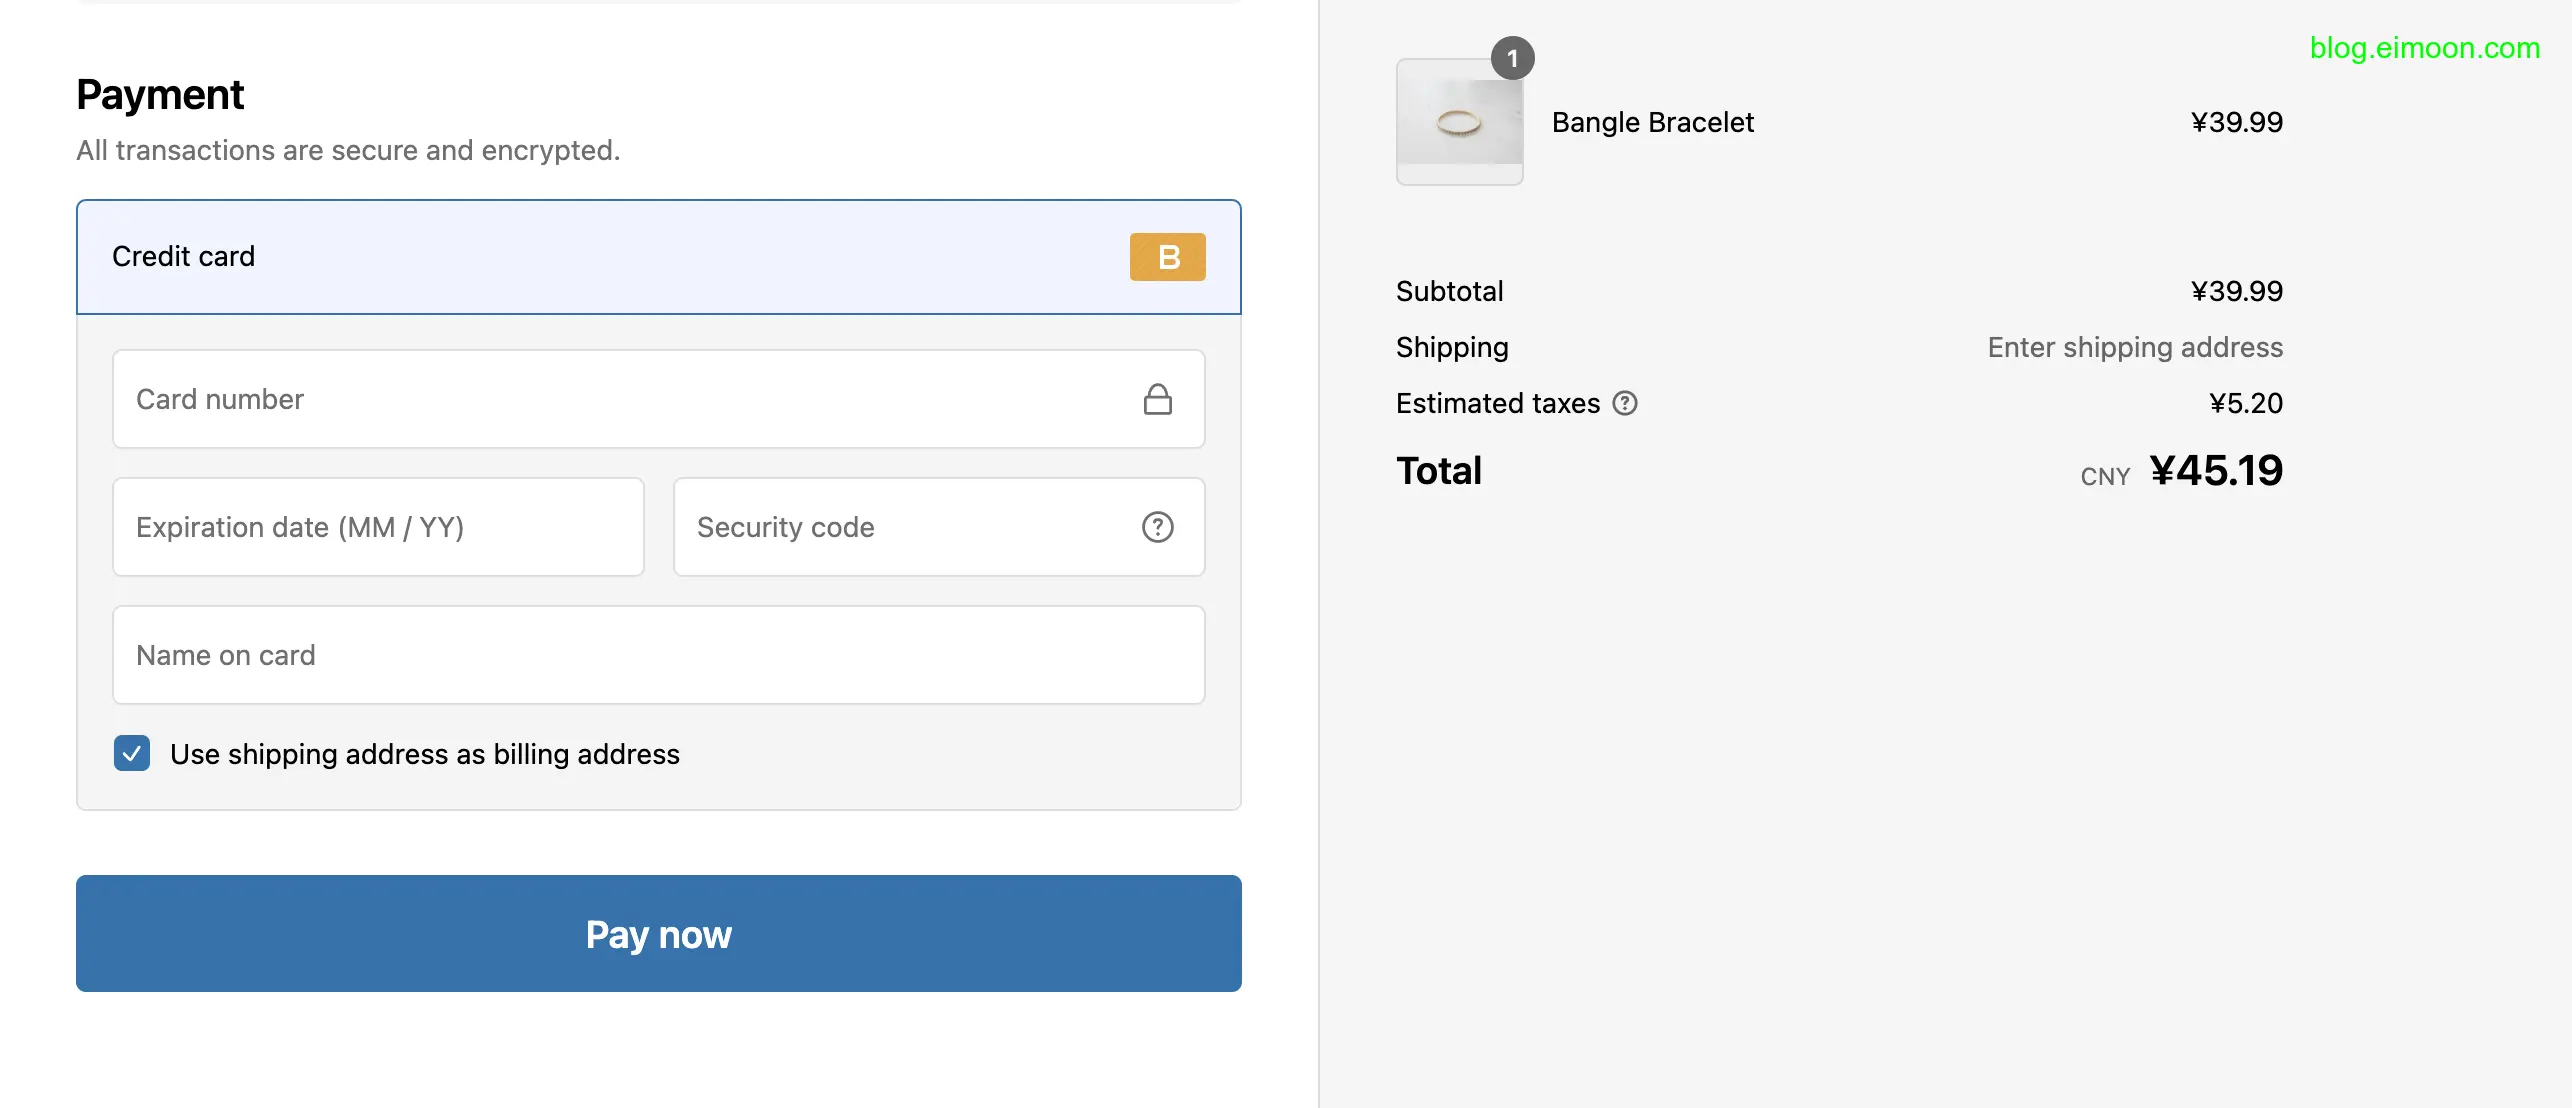
在商品列表选择某一个商品,点击马上购买,如果你已经登陆 shopify 账户会跳转到 shopify 的支付页面,否则会跳转到登陆页面。
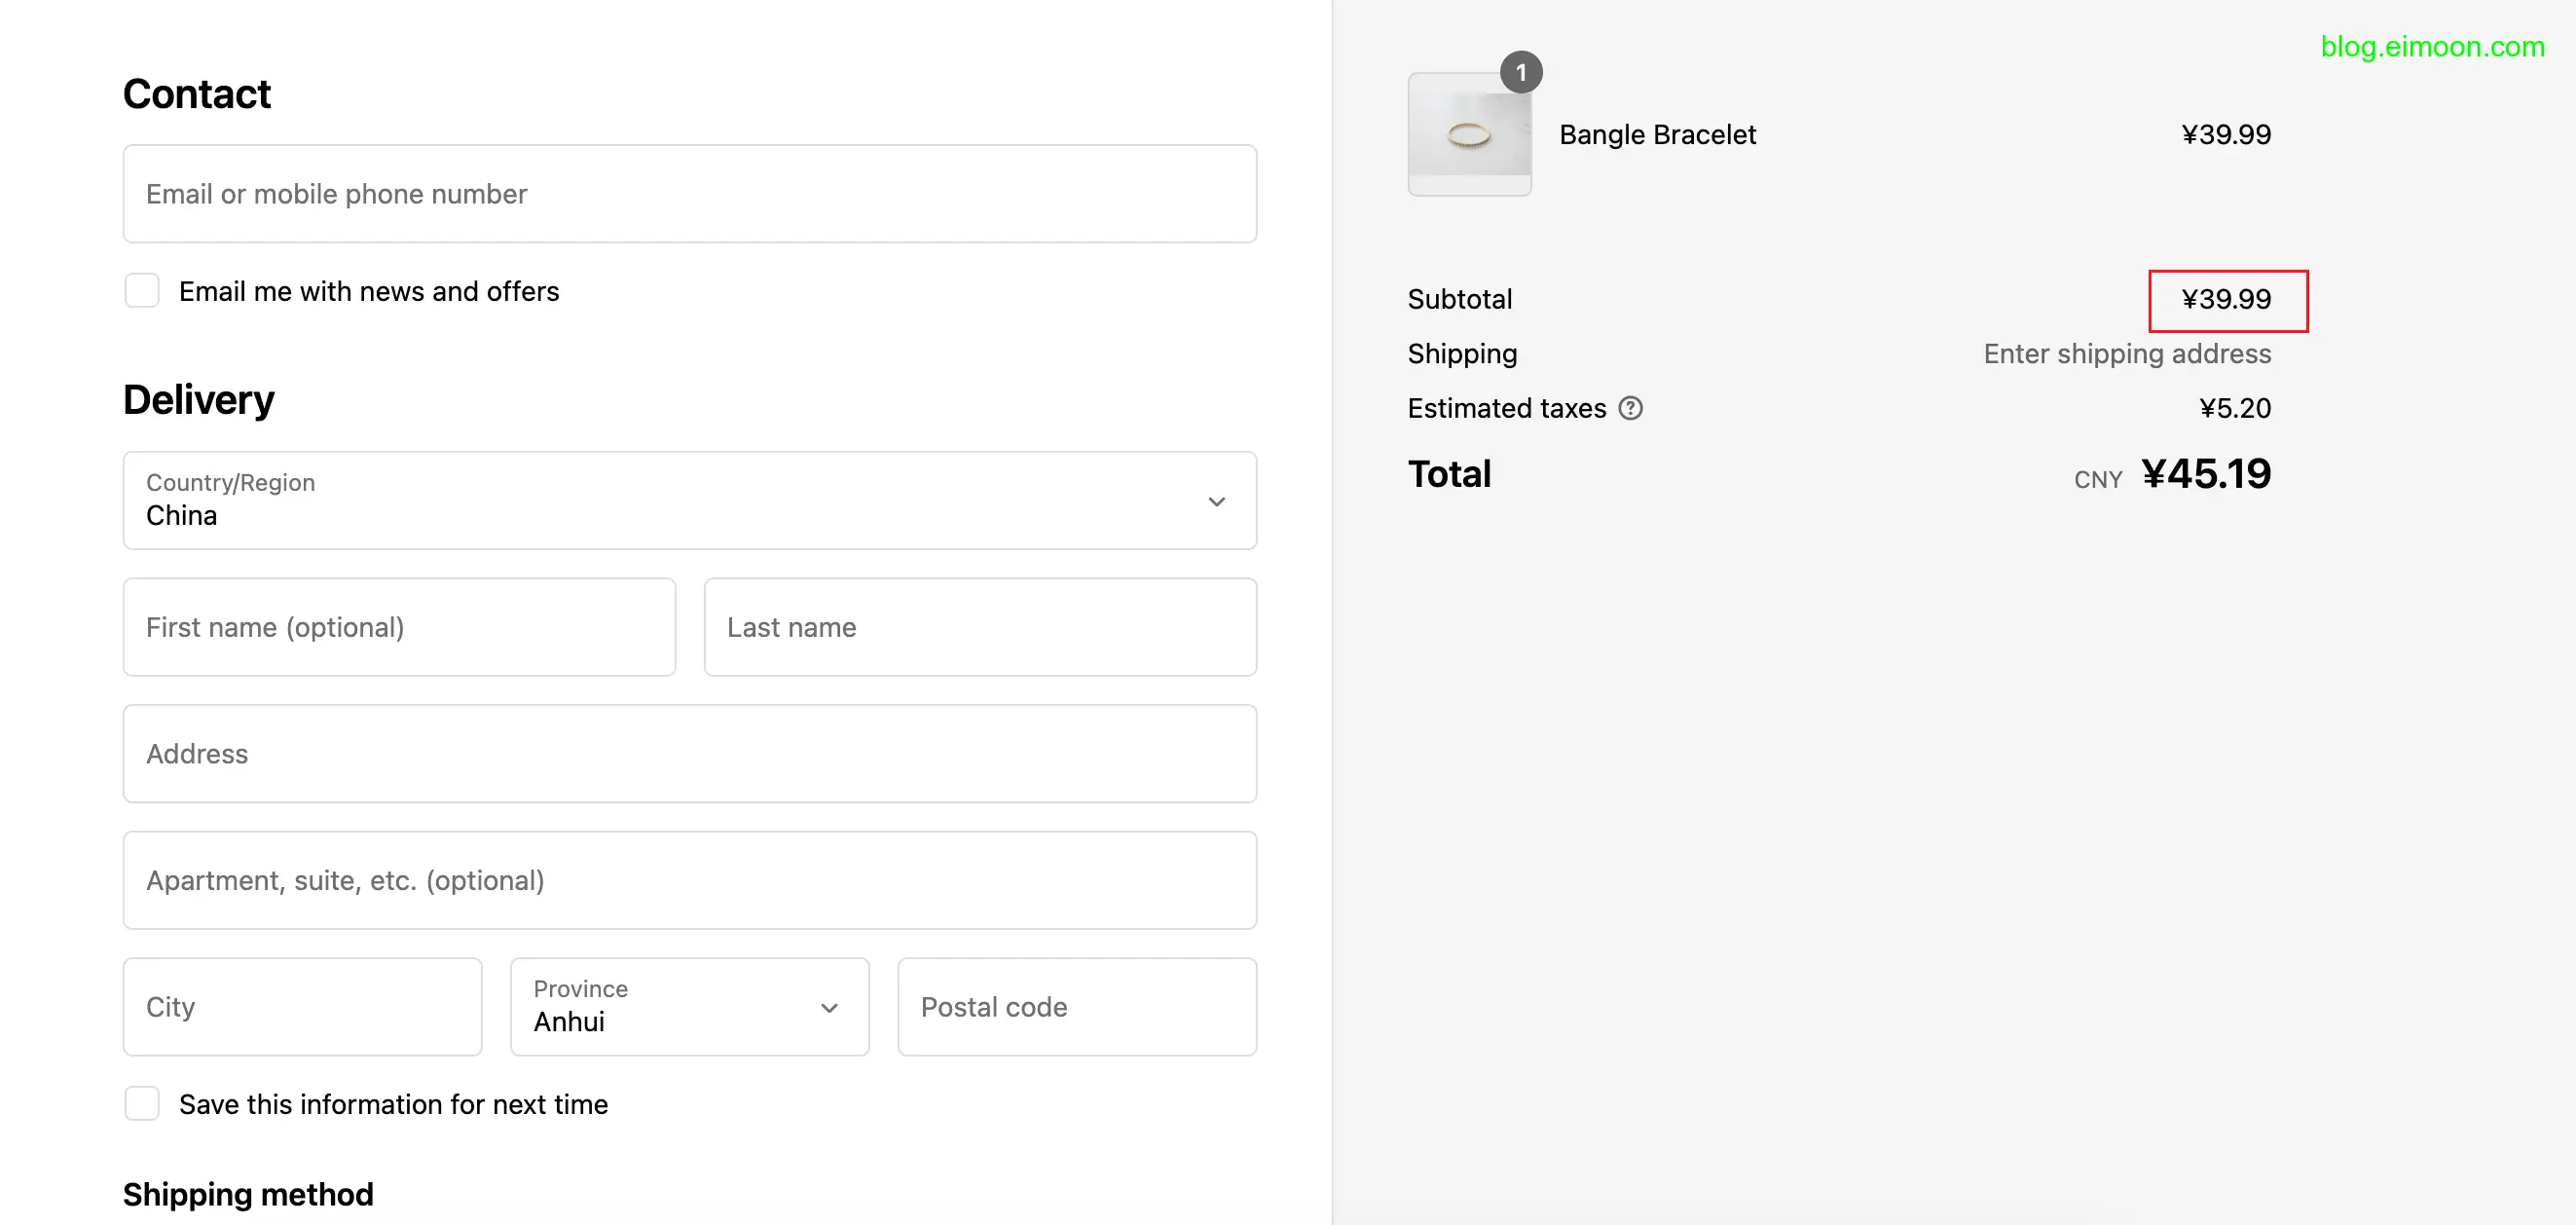
根据 Shopify 的政策,使用 Storefront API 构建的应用程序不能完全复制 Shopify 的所有功能。特别是支付环节,必须借助 Shopify 的支付系统来完成,这也确保了交易的安全性和合规性。
因此,我们完成了一个使用 Next.js 14 和 Shopify Storefront API 构建一个基本的在线商店.
你可以把他部署到vercel上面.部署到vercel上面:基本上是导入,修改环境变量,自动部署,鉴于这篇文章已经够长了,我这里就不赘述了。

总结
本文通过使用 Next.js 14 和 Shopify Storefront API 构建了一个简单的电子商务应用程序。实际开发中,一些和商品属性密切关联的功能,需要根据具体商品属性和营销需求来综合考虑。同时,还可以针对样式美化和更详细的错误处理进行优化,以提升用户体验。 总的来说,本文为您提供了一个基本的 Next.js 14 和 Shopify 电子商务应用程序的构建过程。如果这篇文章对您有所帮助,欢迎分享给您的朋友和同事。
关注我获取更多资讯